Setting Up TradingView Alerts for Cryptocurrencies
Contents
- What Are Alerts on TradingView
- Registering on TradingView
- Free vs Paid Subscriptions
- Choosing a Crypto Pair
- Setting a Basic Price Alert
- Setting Alerts on Indicators
- Types of Notifications
- Managing Alerts
- Optimization Tips
- Pro Tips and Lifehacks
What Are Alerts on TradingView
Definition and Purpose
Alerts are special signals designed to help you stay on top of important events on a chart. They notify traders when the price reaches a specific level or other significant market changes occur.
When you’re trading cryptocurrency, prices can fluctuate. Monitoring charts all day is inconvenient and exhausting. Alerts solve this issue. You simply set a condition, such as “Bitcoin hits $110,000”—and TradingView immediately sends you a notification when it happens.
You can receive these signals on the website, by email, or through the mobile app. This allows you to make timely buying, selling, or observing decisions.
Types of Alerts
TradingView offers several types of alerts. This allows a flexible setup for various goals and strategies.
-
Price Alert. This is the simplest and most popular type. You set a specific level, and when the price reaches it, you get a notification. Examples: “Ethereum dropped to $2,000” or “Bitcoin broke above $110,000.” This helps you enter or exit trades at the right moment.
-
Indicator Alert. You can create alerts based on any indicator. For example, if the RSI rises above 70, it may indicate an overbought condition. An alert will notify you so you can react quickly. You can also set alerts for MACD, moving averages, and other indicators.
-
Alert on Candlestick Patterns or Chart Formations. TradingView allows you to set alerts for specific candlestick patterns, such as an “engulfing” pattern or a “hammer.” This is especially useful if you trade based on candlestick analysis.
-
Alerts from Pine Script. You can include custom alert conditions using indicators or strategies written in Pine Script. This is ideal for advanced users.
Supported Markets
TradingView supports various markets, including stocks, forex, commodities, indices, and cryptocurrency.
You can set alerts for any cryptocurrencies available on the charts. It works for both spot and futures markets.
TradingView pulls data from exchanges such as Binance, Coinbase, Bybit, Kraken, OKX, and others. You choose the data source and work with the exact market you need.
Alerts function the same across all cryptocurrencies, whether you’re watching Bitcoin or a lesser-known altcoin.
Registering on TradingView
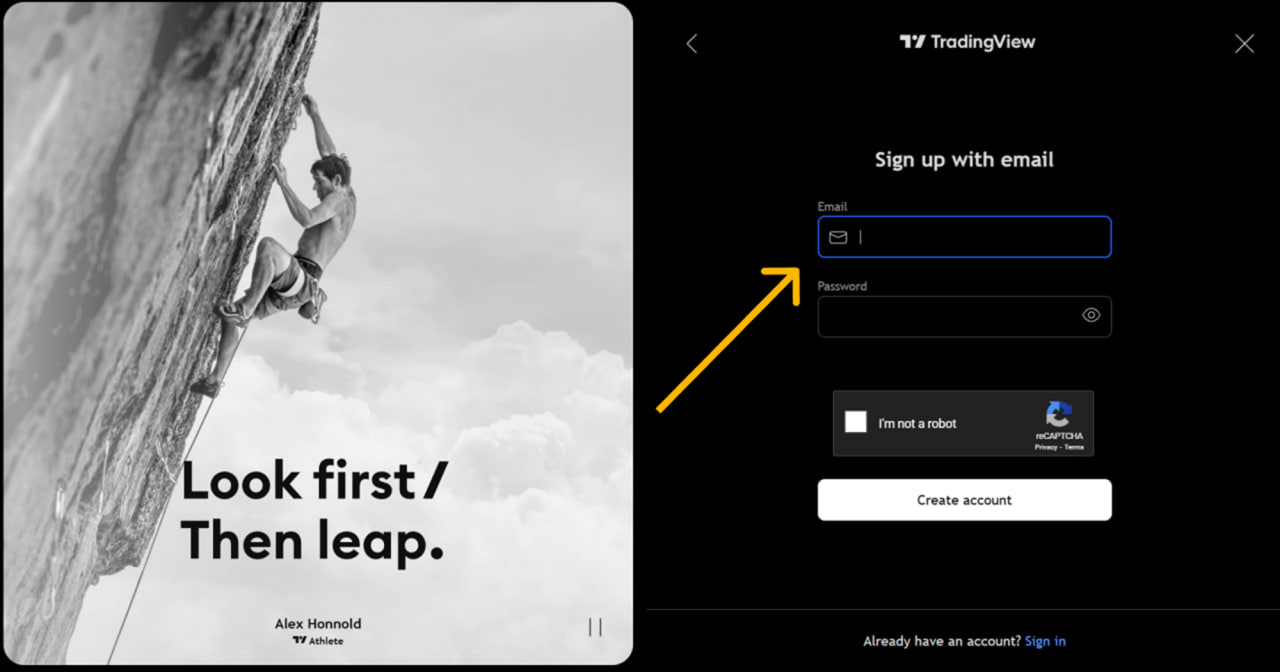
To use alerts on TradingView, you must first create an account. Registration is free and takes just a couple of minutes.
Go to tradingview.com, click “Get Started” or “Sign Up,” and enter your email. You can also log in via Google, Apple, or other services.

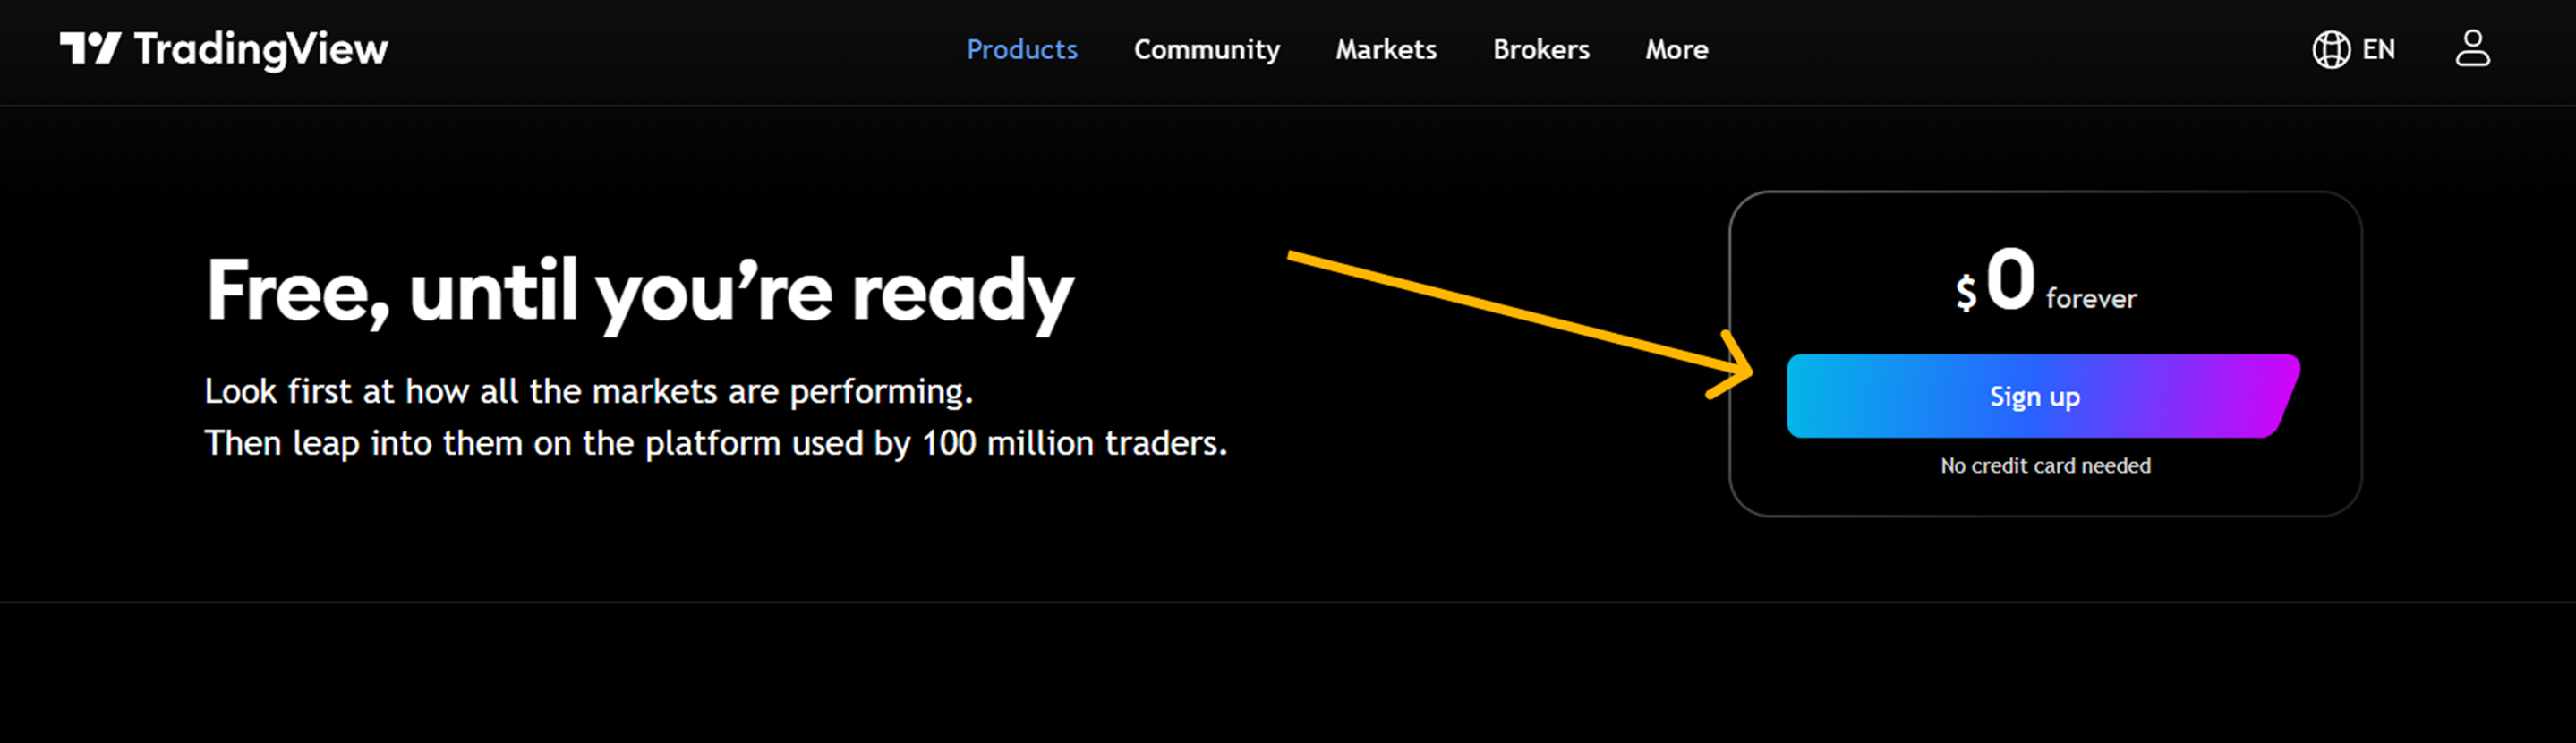
Once registered, you’ll immediately have access to core features. You can start experimenting with alerts, exploring charts, and using basic analysis tools.
Free vs Paid Subscriptions
TradingView offers Free, Pro, Pro+, and Premium subscription tiers. Each provides different levels of functionality.
Free Version
In the free version, you can create up to 3 alerts. Notifications can be received via browser pop-ups or email. This is usually sufficient for beginners or those tracking a single asset.
Paid Versions
Paid subscriptions unlock more capabilities for managing alerts. You can create more simultaneous alerts and use complex conditions.
You’ll also be able to configure recurring alerts without time restrictions. Another key benefit is the ability to receive push notifications directly to the TradingView mobile app, which is very useful if you’re monitoring markets on the go.
To see each plan’s current alert limits and features, check TradingView’s official pricing page.
Choosing a Crypto Pair
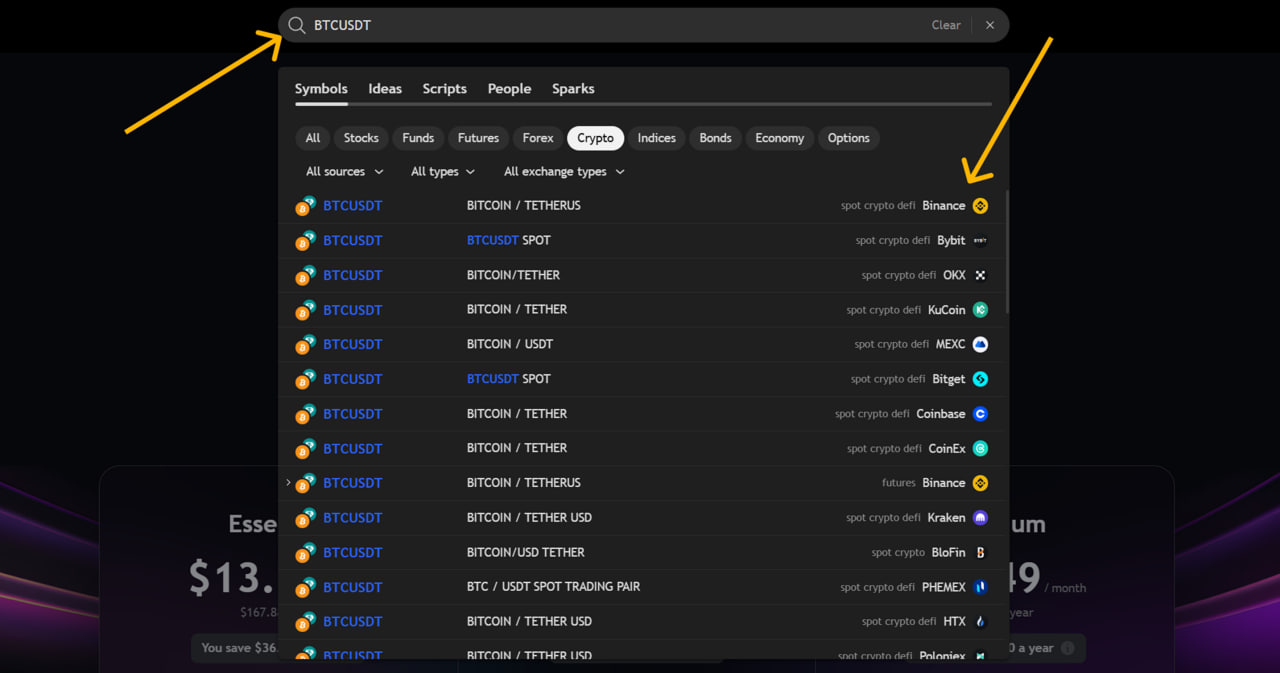
Before setting an alert, choose the correct trading pair. For instance, if you’re monitoring Bitcoin, select BTCUSDT.
To find it, type the pair name in the top search bar. You’ll see a list of options from different exchanges like Binance, Coinbase, or Bybit. Choose the one you use or want to analyze.
Once selected, the pair will open on the chart. You can now add indicators, mark levels, or set alerts. Ensure you’re using the right exchange and pair, or you might get inaccurate signals.
Setting a Basic Price Alert
Open the Cryptocurrency Chart
Start by opening the chart for the coin you want to monitor. Type “BTCUSDT” into the top search bar and select your preferred exchange, such as Binance.
The price chart will appear. You can zoom in, change the time frame (e.g., 1-hour or 4-hour), and add indicators if needed.
Hover Over the Desired Price Level → Right Click → “Add Alert”
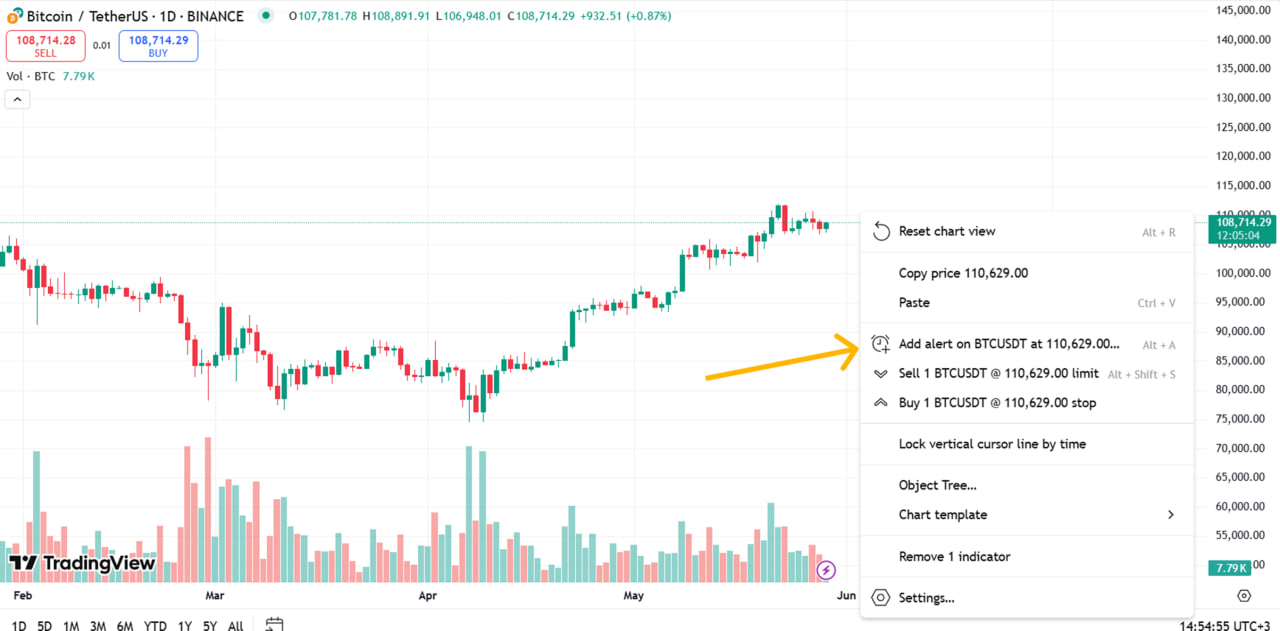
Find the price level where you want the alert to trigger. Hover your cursor over that point on the chart—either along the horizontal axis or near a candlestick.
Right-click and select “Add alert.” This opens the alert setup menu.
Set the Condition (Greater Than / Less Than, etc.)
In the setup window, choose what condition you want to monitor.
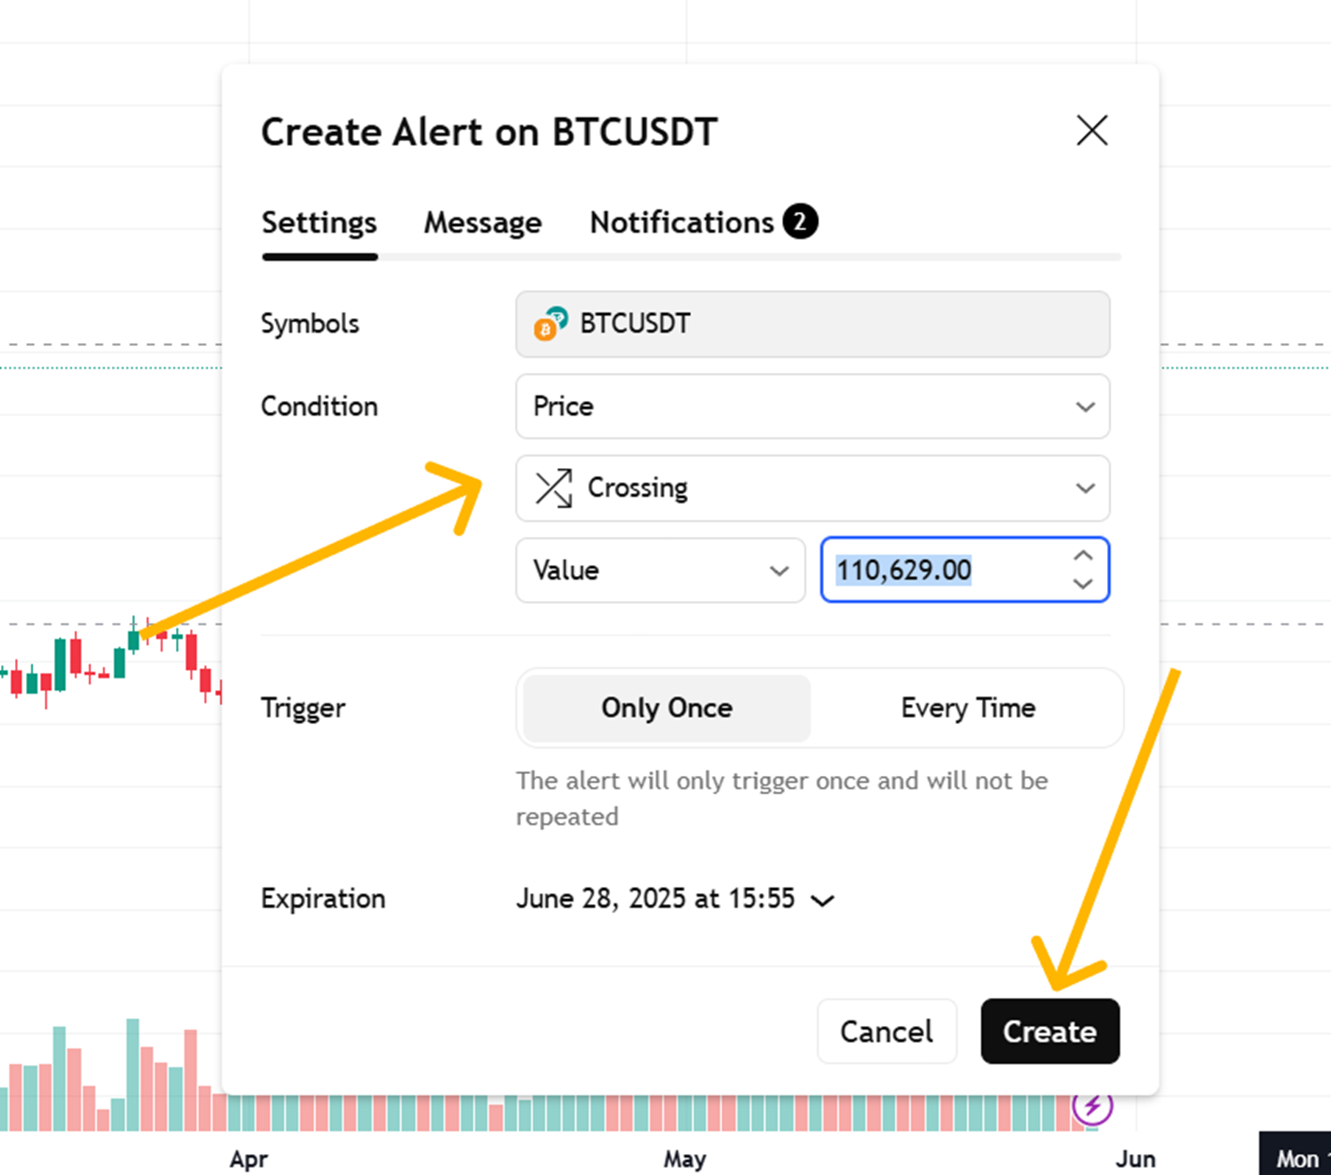
Examples:
-
Price greater than — alert triggers if the price exceeds the set level.
-
Price less than — alert triggers if it drops below the level.
You can also choose crossing or other options. “Greater than” or “less than” is usually enough for simple alerts.
Set the Trigger Frequency
Next, decide how often the alert should trigger:
-
Only once — alert triggers once and does not repeat.
-
Every time the condition is met, the alert re-triggers whenever the condition is met again.
-
Once per bar — alert fires once per candle/bar. Useful for short-term trading.
Choose the option that best fits your strategy.
Set the Alert Name and Message
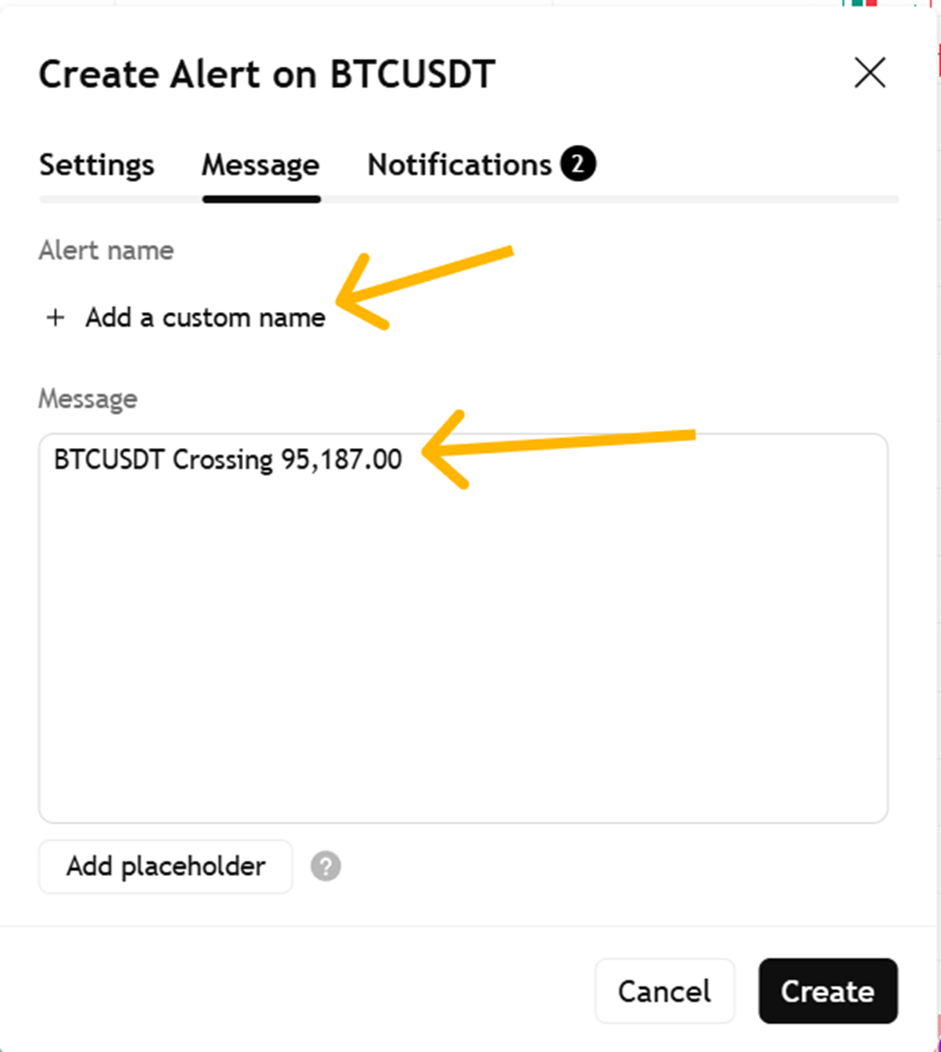
Under the “Message” tab, you’ll find fields for alert name and message content.
Choose a clear name so you can identify it later. For example, “BTC—Breakout Above 110K.”
In the message field, write what you want the notification to say. Example: “Bitcoin above 110K. Check the chart!” This will appear in your app or email.
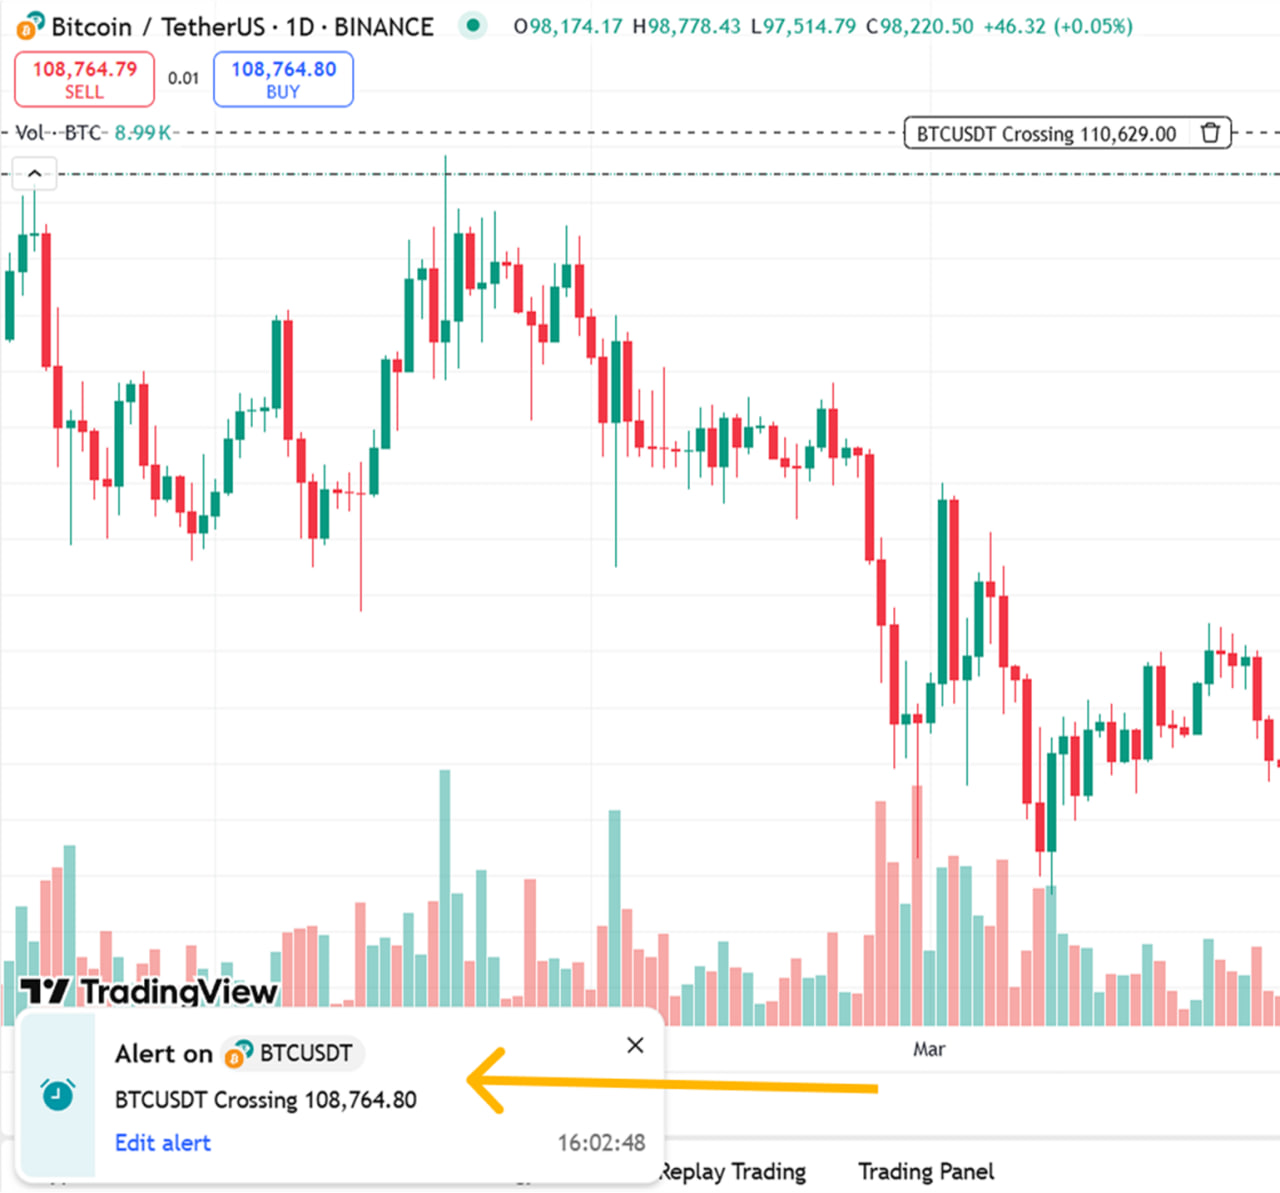
How Alerts Appear on the Chart
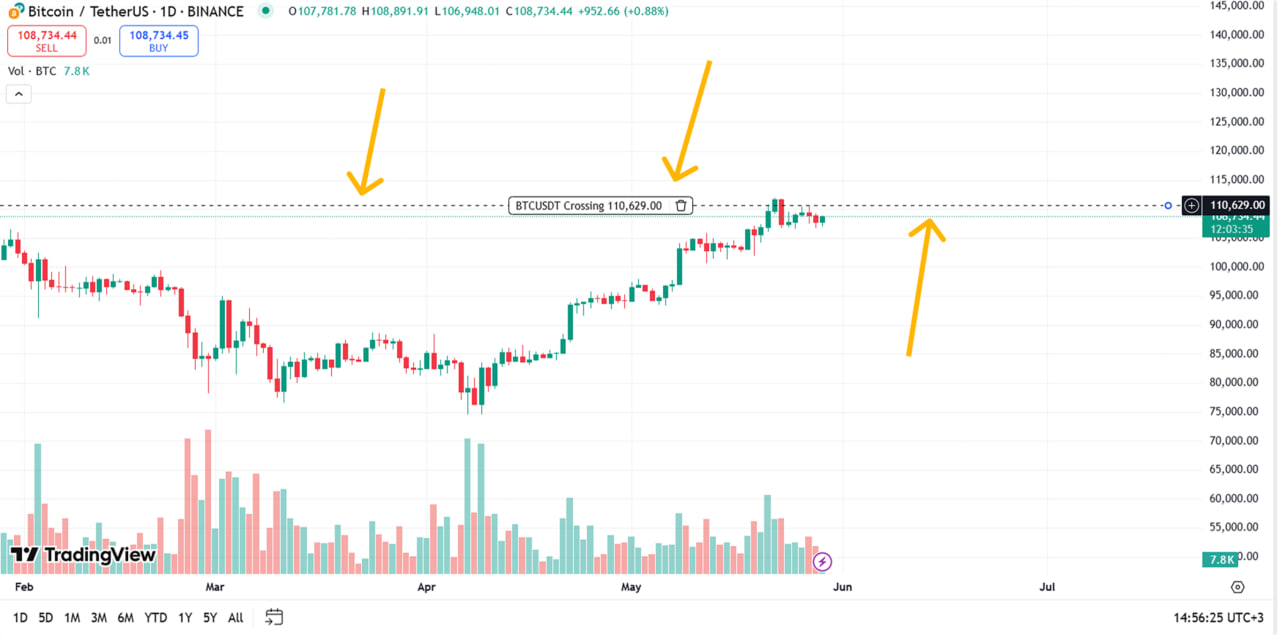
After creation, the alert appears as a dotted horizontal line with a bell icon next to it. Hovering over it will show information such as condition, name, and buttons to edit or delete.
This way, you always know where your alerts are placed and can move or modify them directly on the chart.
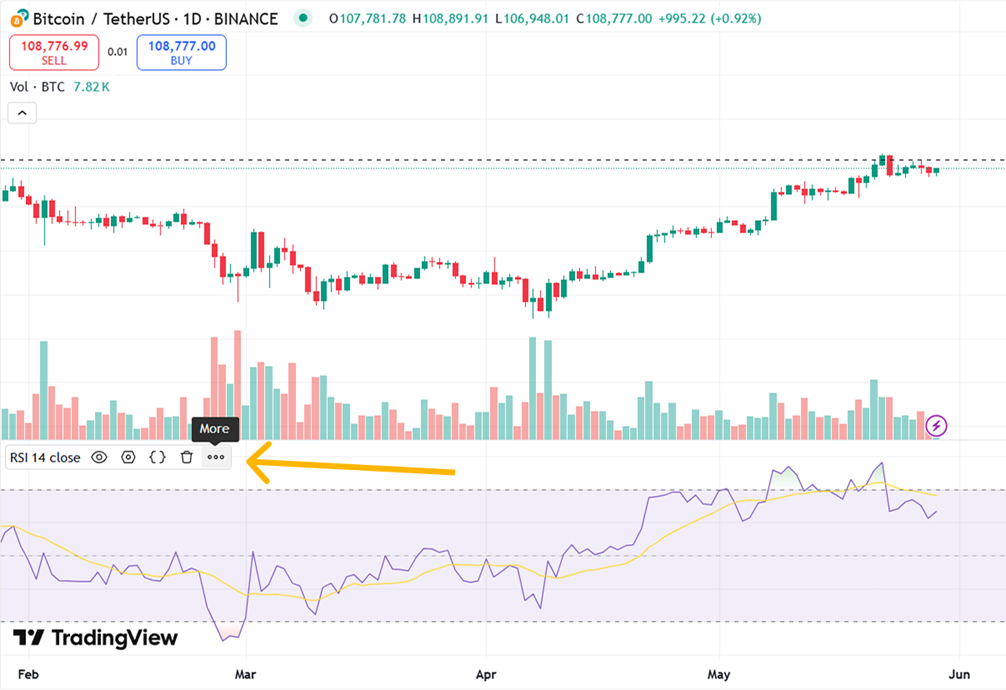
Setting Alerts on Indicators
Sometimes, price levels alone aren’t enough. That’s where indicators come in—they show trend strength, direction, and other key signals. TradingView lets you easily set alerts based on indicators. This is helpful for strategy-based trading when you want signals beyond simple price movement.
Examples: Moving Averages Cross, RSI, MACD, etc.
One popular case is the crossover of two moving averages. For example, when a 9-period MA crosses above a 21-period MA, that could signal a buy. The opposite crossover might signal a downtrend.
The RSI is also widely used. If it rises above 70, the market might be overbought. Below 30, it is oversold. These zones often signal potential reversal points.
Another favorite is MACD. When the MACD line crosses the signal line, it may indicate a trend change.
You can set alerts for all of these to avoid missing essential setups.
Creating an Indicator-Based Alert
-
Open the chart for your chosen cryptocurrency.
-
Click the “Indicators” button at the top**.** Find and add one—e.g**., “Moving Average”** or “RSI.”
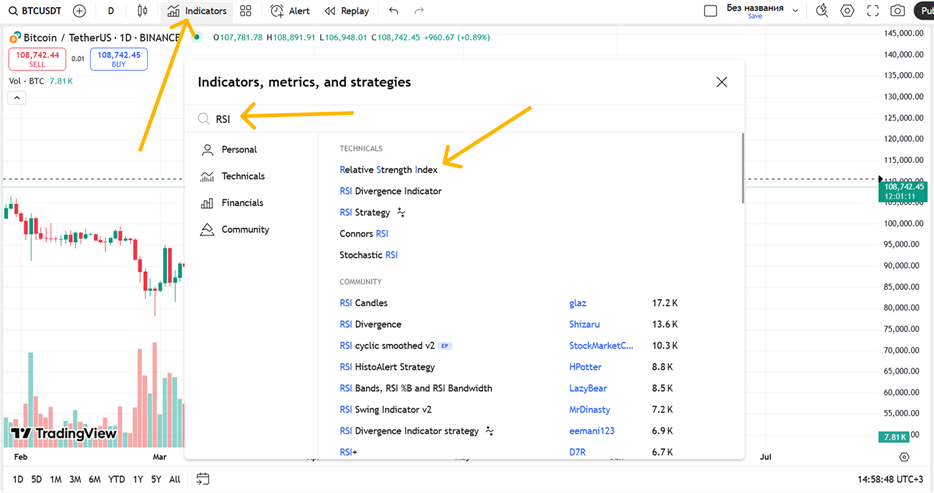
- Hover over the indicator (either on the chart or in the separate panel) and click the three-dot menu next to its name.
- Choose “Add alert.”
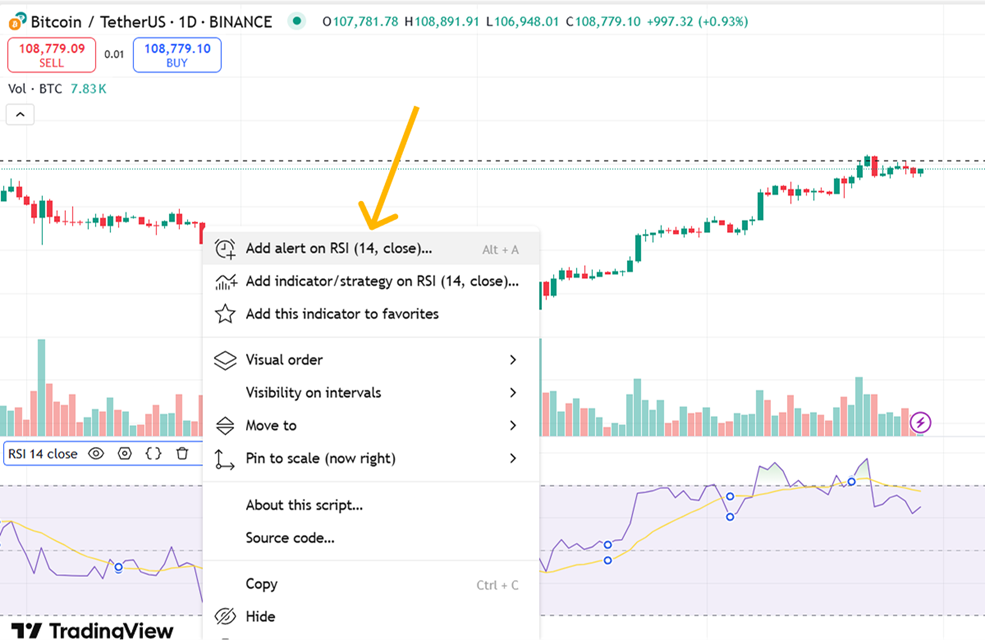
-
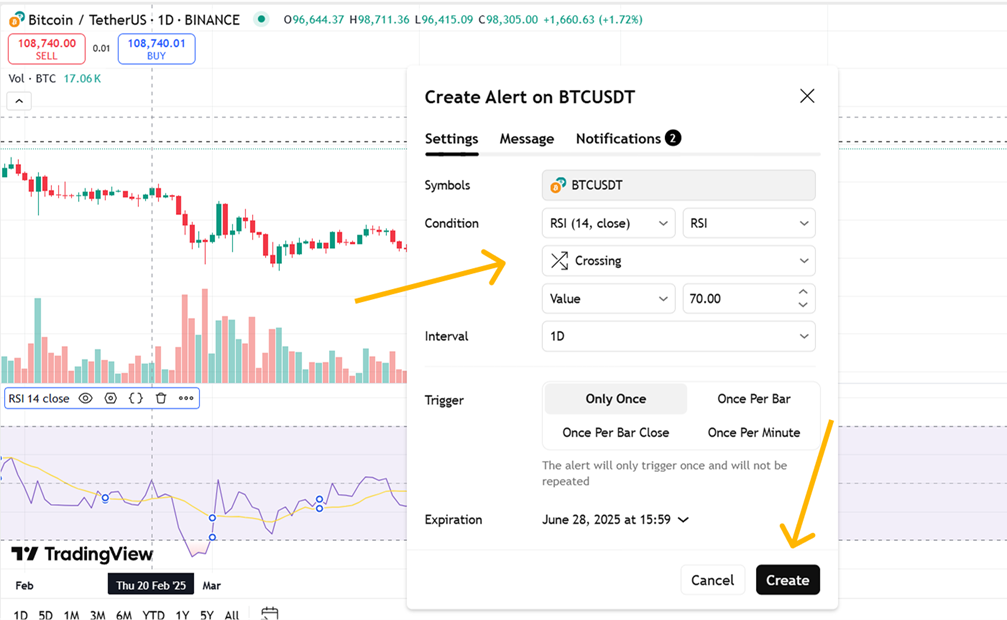
In the alert setup, select your condition. For example, “RSI crossing 70” means the alert fires when RSI exceeds 70.
-
Set the frequency—once, every time, or per bar.
-
Write your message: e.g., “RSI above 70 — potential downward reversal.”
-
Click “Create”, and the alert goes live.
Using a Strategy in Pine Script for Advanced Alerts
If you want to configure more complex signals, you can use Pine Script. This is TradingView’s built-in programming language, allowing you to create custom conditions and strategies.
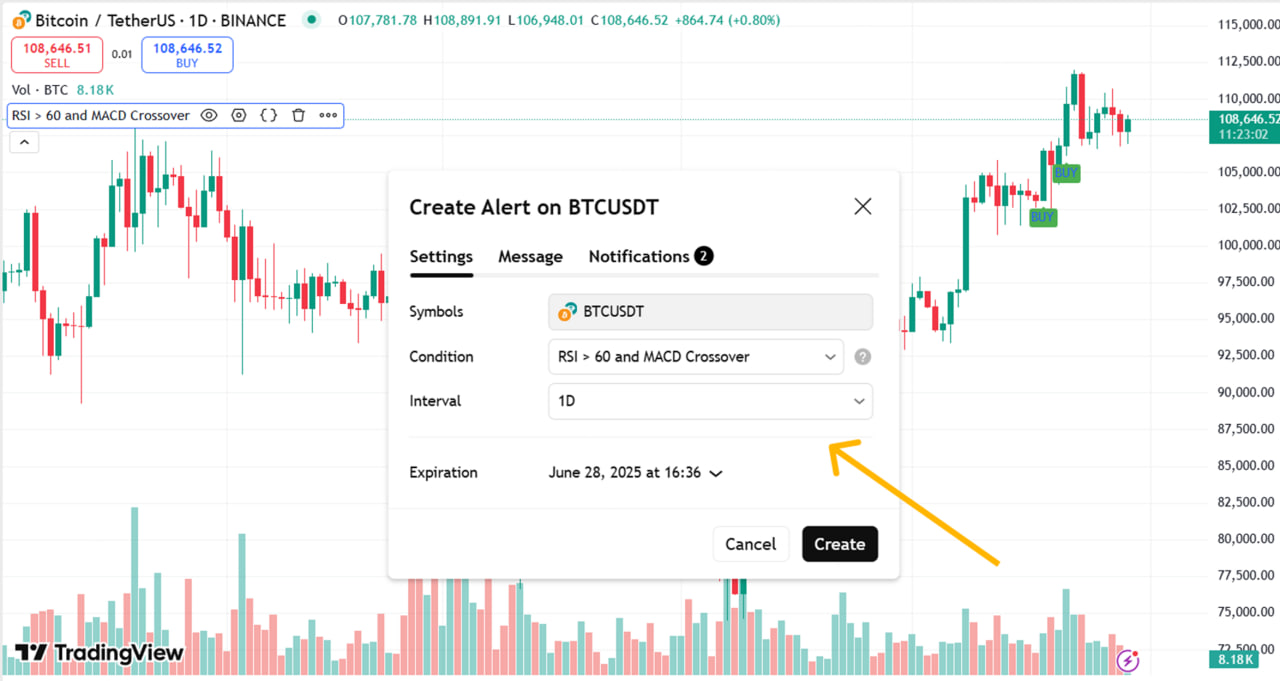
For example, you can set a condition that an alert will trigger only if the RSI is above 60 and the MACD crosses the signal line at the same time.
To do this:
- Open the Pine Script editor (located at the bottom of the chart).
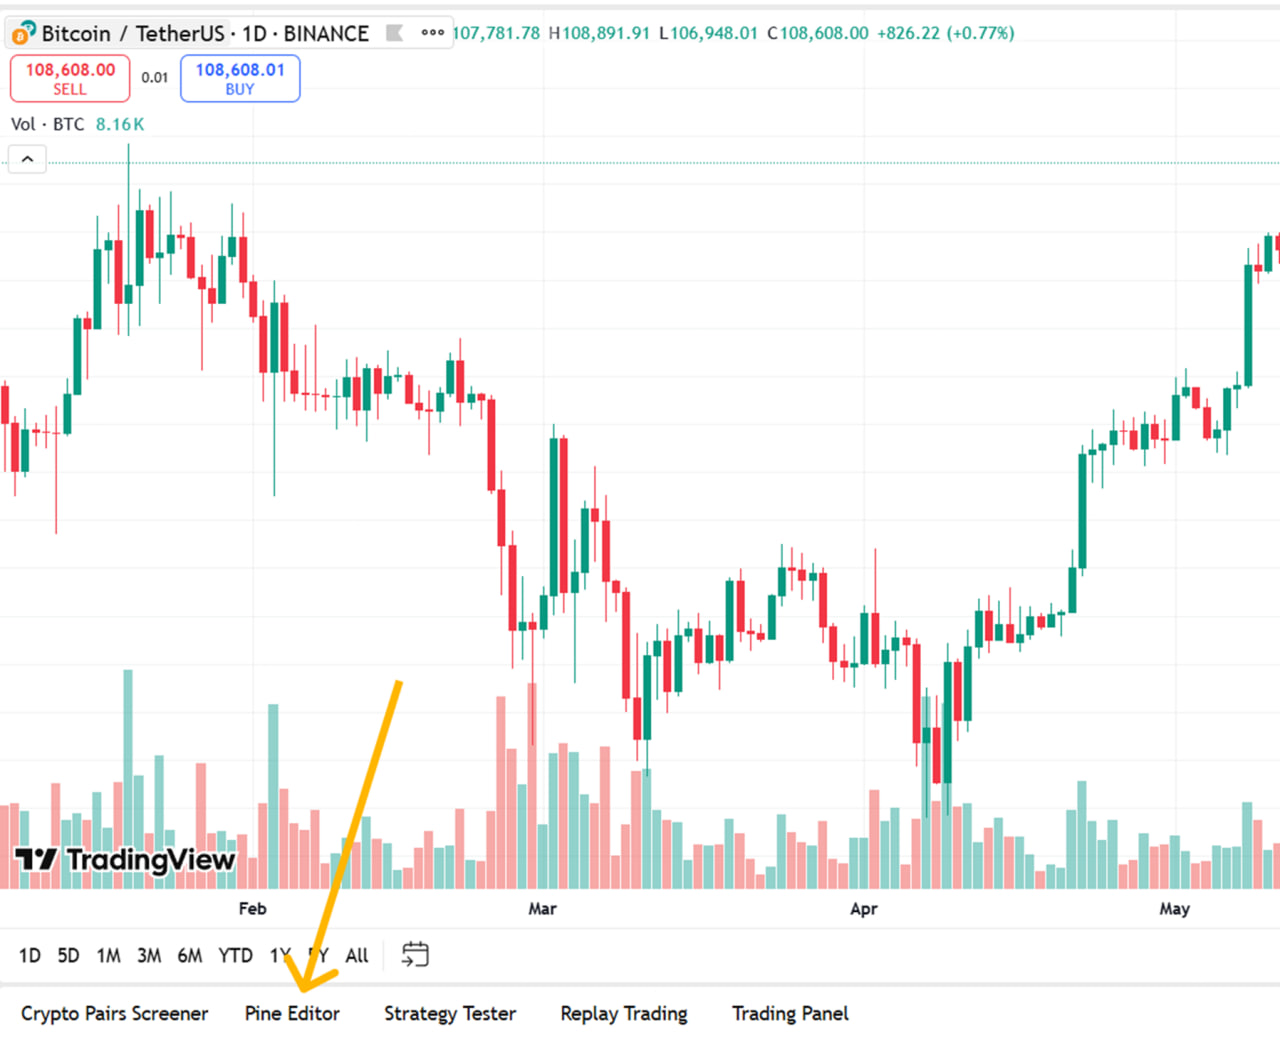
-
Write the code with your desired conditions.
-
Save the script and add it to the chart.
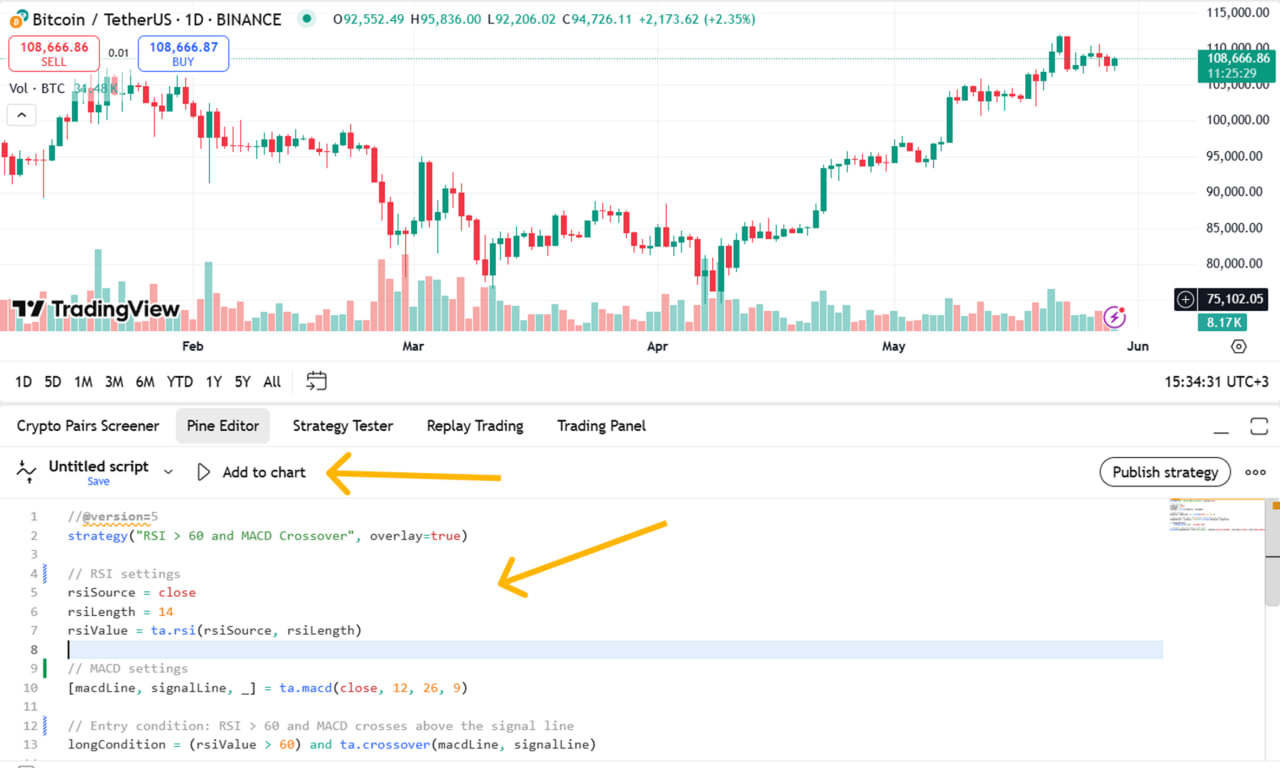
- Click the three dots next to the indicator and select “Add alert”.
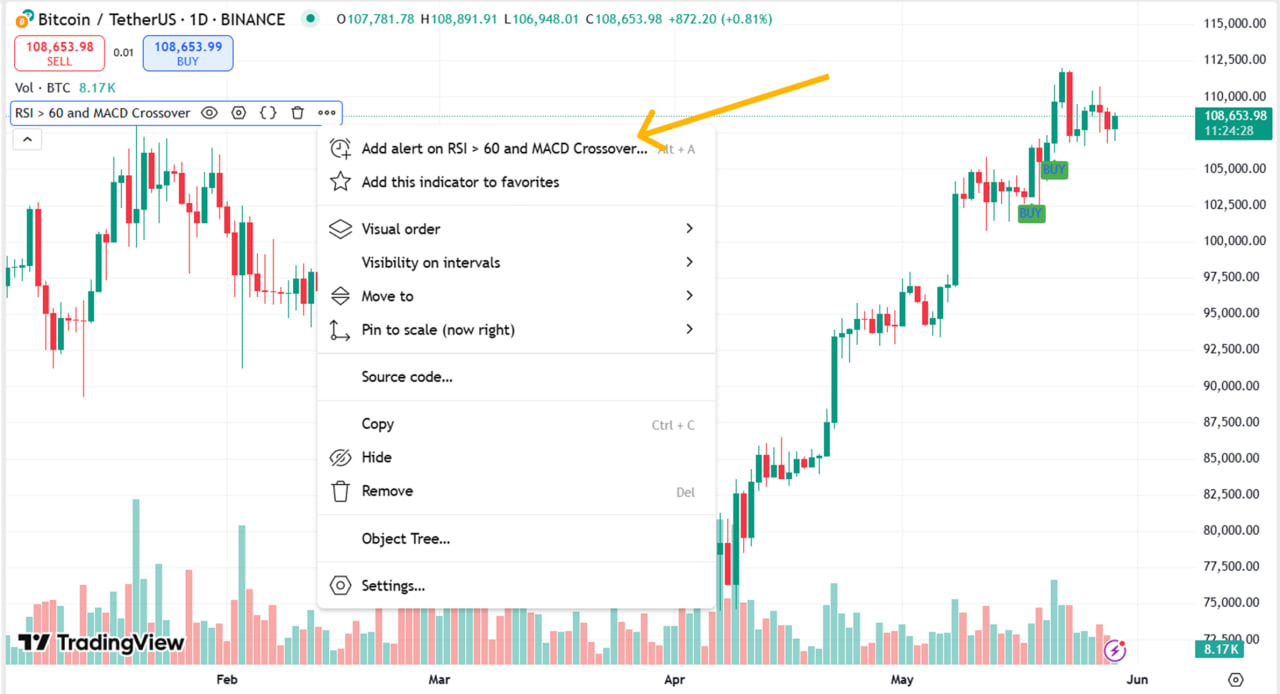
- Specify what action should trigger the alert: entry, exit, or another condition from the script.
This tool is for users seeking complete flexibility. But even without writing code, you can do a lot—choose the indicators you need and configure alerts in a few clicks.
Types of Notifications
TradingView alerts don’t just trigger silently. The system can send you messages in various ways to ensure you don’t miss a crucial moment. Below, we explain the available options and how they differ.
Pop-up Window on Screen
This is the simplest option. When an alert is triggered, a window with a message appears on the screen. It shows what happened and which asset was involved. You’ll see this notification immediately if you’re on the TradingView website or using the desktop app. It’s convenient when working at your computer and monitoring charts in real time.
Email Notification
If you’re away from your computer, you can choose email alerts. When an alert is triggered, a message is sent to your email. It will include information such as which asset triggered the alert and other relevant details. This option is suitable for users who check their email throughout the day and don’t want to keep the chart open at all times.
Push Notifications in the TradingView App
You can enable push notifications if you have installed the TradingView mobile app. Then, alerts will go directly to your phone. This is especially convenient if you’re not often near your computer. Once the condition is met, the app sends a message, so you know which alert was triggered and which coin.
Webhooks (for Integration with Bots, Telegram, and Other Platforms)
Webhooks are available for users who want to automate processes. This is a special method of sending a signal to an external service. For example, you can configure an alert to a Telegram bot or trigger a trading bot on another platform.
You must enter a special URL when creating the alert to make this work. Once the condition is met, TradingView sends a message to that URL. You can include any necessary data in that message, such as the asset name, price, and time.
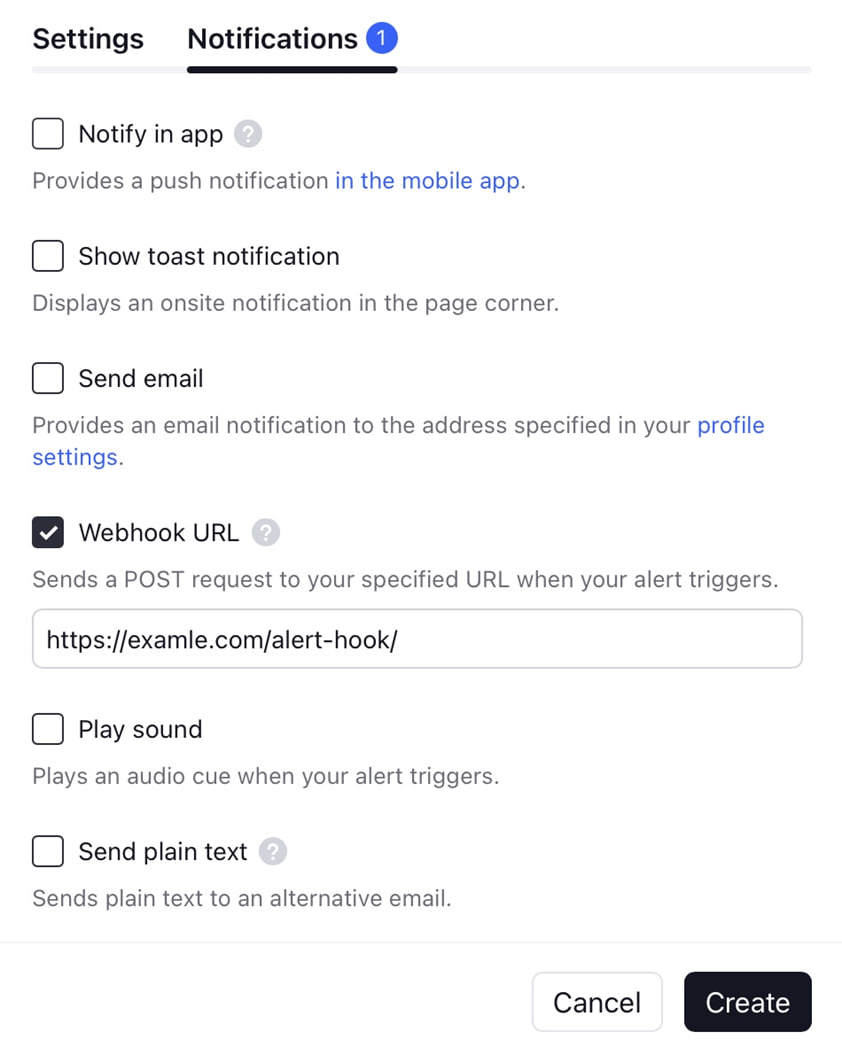
This method suits advanced users who combine alerts with other tools, such as automatically opening trades via platforms like 3Commas, WunderTrading, Cornix, Alertatron, or Zignaly. Alerts can also be connected to your algorithms or used to send signals to trader chats.
Managing Alerts
When you have many alerts, it’s essential to stay organized. You need to find the right signals quickly, disable those that are no longer relevant, and configure everything according to your goals. Here’s how to do that.
Viewing All Active and Triggered Alerts
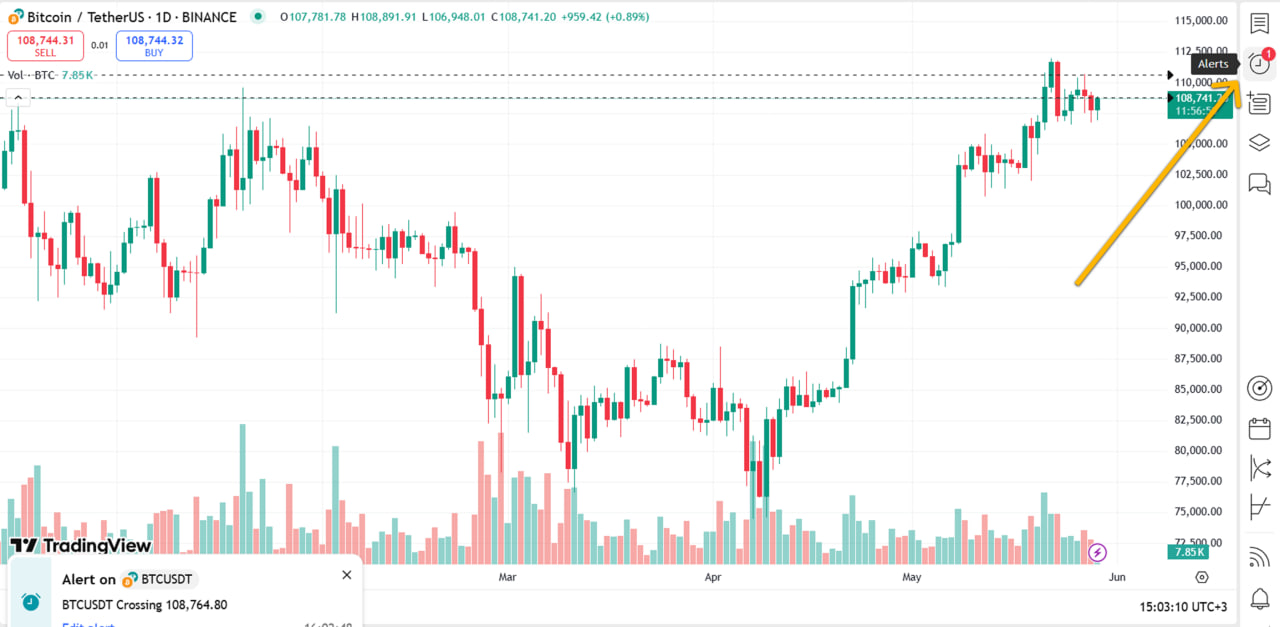
To view the list of all your alerts, click the alarm clock icon at the top of the TradingView window. A panel will open showing all alerts. It has two sections: active and triggered.
In the active section, you’ll see alerts that haven’t fired yet. Triggered alerts are those that have either fired or been manually disabled. This list lets you quickly see which signals have already worked and are still active.
How to Disable, Edit, or Delete an Alert
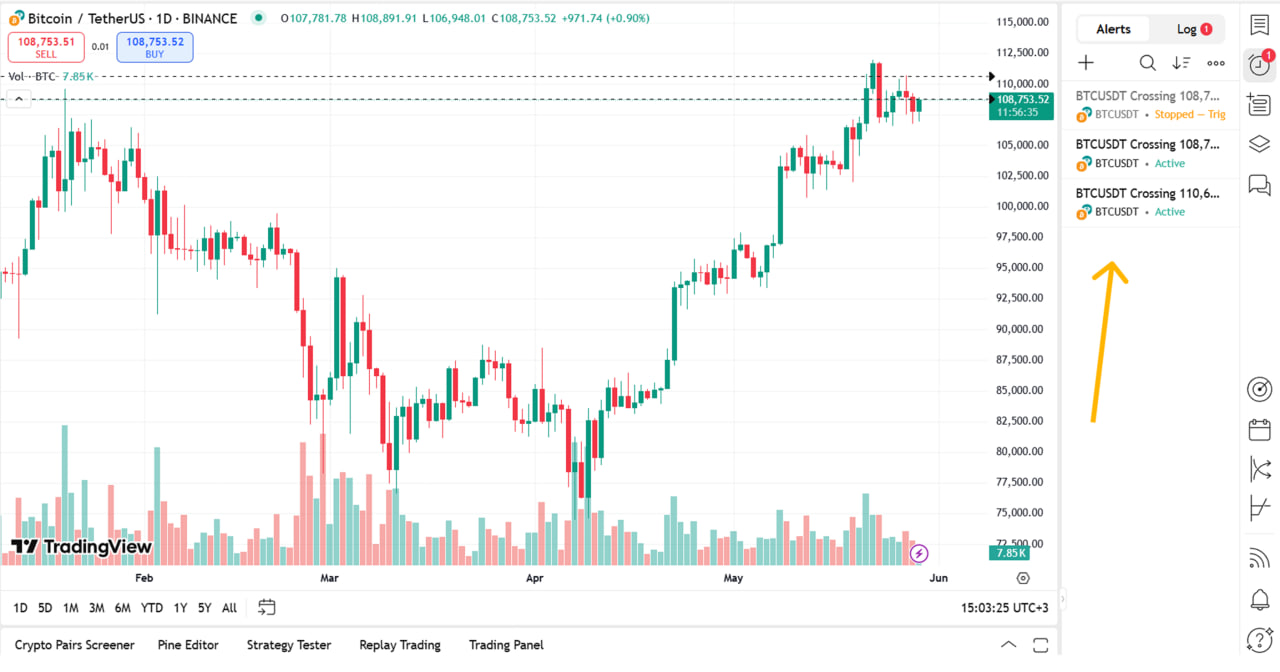
Sometimes an alert is no longer needed, or its conditions must be changed. To do this, reopen the alert list. Next to each item are buttons.
If you want to pause an alert temporarily, click the pause icon. The system will stop sending notifications, but the alert will be saved. You can re-enable it at any time.
To edit an alert, click the pencil icon. A settings window will open where you can change the price, condition, notification type, and more.
If an alert is no longer needed, click the trash icon. This will permanently remove it from the list.
Optimization Tips
Avoid creating too many identical alerts. That can lead to confusion. It’s better to think through the logic in advance and make a few precise signals than dozens of unnecessary ones.
It’s helpful to give each alert a clear name. For example, instead of just “BTC,” name it “BTC – breakout above 70K.” That way, you’ll immediately understand what the signal refers to.
Don’t enable too many notifications. If your phone keeps buzzing, you’ll stop paying attention to the alerts. It’s better to configure fewer but handy alerts.
Pro Tips and Lifehacks
If you learn how to use alerts correctly, they become a powerful assistant in your trading. Below are a few simple tips to help you get the most value from them.
Using Alerts with Trading Strategies
A strategy almost always relies on clear rules: entry on breakout, exit at target, filtering by indicator. Linking alerts to these key points is better than watching the chart all day.
For example, if you trade based on a moving average crossover strategy, you can set an alert when one line crosses the other. Or if you’re waiting for a support zone to be touched, just specify the level and create an alert.
This way, you won’t miss a critical moment even if you’re not watching the chart in real time.
Integration with a Telegram Bot via Webhook
Standard notifications are helpful, but you can connect a Telegram bot via Webhook if you want more flexibility.
To do this:
-
Create your own Telegram bot using BotFather or other services.
-
Connect it to an exceptional service that receives signals from TradingView.
-
In the alert settings, select “Webhook” as the notification.
When an alert is triggered, a message will be sent directly to Telegram. This is convenient if you want to receive or share alerts as styled messages with a team.